MASTERS of ArchiCAD SUMMIT – ground-breaking online conference Feb. 5 & 6

Masters of ArchiCAD from around the world share their expertise, passion, and the wisdom of experience in the first-ever MASTERS of ArchiCAD SUMMIT. Broadcast live over two days, recordings will also be available. Early-bird registration now open.
3D Details and Automated Specification by Timothy Ball RIBA at ArchiCAD Summer School

Video re-work of a presentation given to Archicad Summer School 2014 in Cardiff showing some ideas about 3D details and use of IFC parameters to create an automated specification.
ArchiCAD Winter School – January 24-31, 2015

ArchiCAD Winter School is an event created by users for users. ArchiCAD Users Association International is behind the organisation which ensures that the whole event and the programme are user-centric. Early bird registration runs thru November 23.
ArchiCAD Question of the Day – June 12, 2014

In this section, I take a question submitted by a user and answer it, either in writing or with a video.
Email your questions to questions@archicaduser.com.
You can send me a file with Dropbox – email the link or share a folder to send more than one file.
TODAY’S ARCHICAD QUESTION
Today’s question is one that I have received a number of times from ArchiCAD users:
How do I get Window and Door markers to show?
For some reason, they are not appearing as they should, even though I’ve checked the settings everywhere I can think of.
THE ARCHICAD ANSWER
Window and Door markers are set in the Window or Door Settings dialog, or the Info Box. They are called “Dimension Markers” and come in a variety of styles depending on which version of ArchiCAD you have. Some show the ID for the element inside a circle, hexagon, diamond or other shape; there are others that show the size or dimension of the opening.
Dimension markers will be visible if ALL of the following conditions are true:
1) The layer is visible for the wall that contains the windows or doors.
2) The Model View Option (MVO) is set to show Dimension Markers for windows and/or doors. The MVO setting is recorded as part of the View Settings, so specific Views may have different model view options set. This allows you to have markers showing on construction document floor plans, but turned off on ceiling plans, furniture plans, etc. The active MVO may also be set manually using the Document menu > Model View Options submenu.
3) In a remodel project in ArchiCAD 15 or later, the active Renovation Filter needs to be set properly. For example, if the windows or doors are set to Existing status (meaning they already exist and are not part of a New design), then you will need to check that the Renovation Filter does not have the checkbox set to Hide the Dimension Marker for Existing Elements. This checkbox allows you to easily hide markers for existing doors and windows while showing them for new ones; while useful, this setting can sometimes be confusing: “why aren’t my window markers showing?!!”
4) The dimension marker style for each door and window is controlled in the door or window settings or Info box. Make sure that the dimension marker is chosen properly. If it is set to “No Marker” then there will be no marker showing. This is useful for Empty Openings and other windows and doors for which you do not want to show a Marker.
The ID (which will be seen on plan in the marker as well as in a schedule) may be set in the Tags and Categories section of the Window or Door Settings dialog, or in the Info Box.
ArchiCAD Question of the Day – May 23, 2014

In this section, I take a question submitted by a user and answer it, either in writing or with a video.
Email your questions to questions@archicaduser.com.
You can send me a file with Dropbox – email the link or share a folder to send more than one file.
TODAY’S ARCHICAD QUESTION
Today’s question is one that I have received from a number of ArchiCAD users in the past year – the red haze or translucent volumes that sometimes appear when you’re looking at your model in the 3D window.
Lena Vikander wrote:
I was creating a roof, and when I switched to the 3d view, a pink/red “ghost” building was enclosing my building. I could not select it. What is it and how do I get rid of it?
Carole Wylie asked:
Can you tell me why my 3D model has this red aura about it? I don’t know what I did?
THE ARCHICAD ANSWER
The pink/red ghost is called the Trimming Body for the roof. This is turned on and off using the View menu > Onscreen View Options > Trimming Bodies command.
While you normally do not want the Trimming Bodies to show, they are useful sometimes for checking and manipulating Roofs in ArchiCAD 15 and later versions. Each roof may be set to have the Trimming Body based on the Contours (overall extent of the roof) or the Pivot Lines (the area within the pivot lines, which often are set to run along the face of the exterior walls. The Trimming Bodies of two or more Roofs or Shells can be combined to create more complex modeling configurations.
When you’re finding it challenging to Trim walls or other elements to a Roof (either too much gets cut off, or too little), make the Trimming Bodies visible so you can troubleshoot and adjust the settings.
ArchiCAD Question of the Day – May 11, 2014

In this section, I take a question submitted by a user and answer it, either in writing or with a video.
Email your questions to questions@archicaduser.com.
You can send me a file with Dropbox – email the link or share a folder to send more than one file.
TODAY’S ARCHICAD QUESTION
Today’s question comes from Ben Jacks, a new ArchiCAD user who is going through my QuickStart Course on the ArchiCAD basics:
I have a wall “cleaning up” question. I am unsure if I should resolve it completely or let it go for now:
I have thick exterior walls with a reference line near but not on the outside of the wall. I have thinner interior walls with reference lines that are centered and sometimes on one side of the wall. The walls will eventually be completely different materials (at present they are generic exterior and interior. The are on different (exterior and interior) wall layers
They will not clean up. This is a perpendicular T. I have tried using “adjust,” intersect, extending the interior manually to the inside, and stretching the reference of the interior to touch the reference of the exterior. Most times the interior wall lines go all the way through the exterior wall and stop at the outside line.
It seems an awkward workaround to stop the interior wall short of the inside.
Can you explain what is going on and what I should do?
THE ARCHICAD ANSWER
The standard Graphisoft template for ArchiCAD 17 has an issue with regards to the intersection priorities for the generic interior and exterior Building Materials. The interior one has a higher priority than the exterior one, so if you’re using these generic materials, you experience this issue.
Fortunately, it is easily fixed. Select both an interior and an exterior wall, then open up the Options menu > Element Attributes > Building Materials. You’ll see the materials highlighted in green that are currently in use by the selected elements. Click on the Priority heading at the top of the list to sort by priority, rather than by name, then drag the Generic Exterior material below the Generic Interior one.
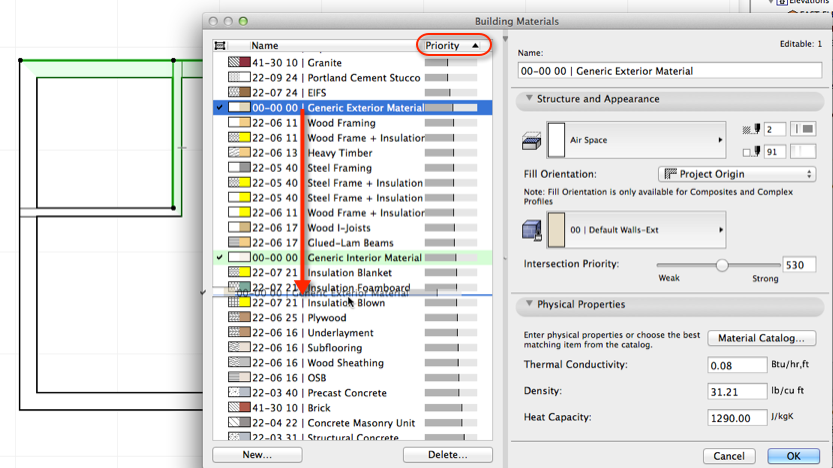
This will make ArchiCAD adjust the Intersection Priority for the exterior material to be higher than the interior material.
Click OK to confirm, and when you return to the floor plan, the walls will clean up the way you expect, with the interior ones giving way to the exterior ones, rather than going all the way through.
ArchiCAD Question of the Day – April 8, 2014

In this section, I take a question submitted by a user and answer it, either in writing or with a video.
Email your questions to questions@archicaduser.com.
You can send me a file with Dropbox – email the link or share a folder to send more than one file.
TODAY’S ARCHICAD QUESTION
Today’s question comes from Rajagopala Hathwar:
I faced problem, when several elements comes in one place and in the same floor, selecting one element while go for edit. What is the best solution to select freely individual element?
THE ARCHICAD ANSWER
When you hover over an element with the selection arrow, look for the indication in the pre-selection highlight that there are multiple elements available for selection. You’ll see the pre-selection box have an extra one “behind” it and a reference to TAB for switching the selected item.
Hit the TAB key on your keyboard (usually above the CAPS LOCK) and you’ll see ArchiCAD switch to highlight and pre-select one of the alternate elements underneath the arrow. Click with the arrow tool when the desired element is highlighted, and that one will be the one that is selected.
ArchiCAD Question of the Day – April 1, 2014

Today I’m starting a new section of the ARCHICAD USER website – the ArchiCAD Question of the Day!
In this section, I’m going to take a question submitted by a user and answer it, either in writing or with a video. Email your questions to questions@archicaduser.com.
You can send me a file with Dropbox – email the link or share a folder to send more than one file.
TODAY’S ARCHICAD QUESTION
Today’s question comes from Mohamed Alahmedi:
Hello sir,
How are you? I hope you and your family are very well. Moreover, so do your all staff. I am fine. Thank you so much sir for your continuous messages and help. I am getting the most benefit of them.
Today I have two questions?
1- How to trim curtain walls to roof in Archicad (15)?
2- In old Archicad versions like (12), I used to create different shapes using normal walls and roofs. I trim walls to roofs, and then I delete the roofs, so that I can get the shapes I want. I cannot do so in Archicad (15) because, when I delete roofs after using trim to roof the walls return to their normal shapes!
Always I look forward to hearing and receiving from you.
Yours sincerely
Mohamed Alahmedi
THE ARCHICAD ANSWER
You can trim curtain walls, just like other elements, using the Connect > Trim Elements to Roof / Shell command, or with Solid Element Operations (SEO), or with the Crop to Single-plane Roof command.
In the 3D Window, select the curtain wall(s) and the roof(s) and right-click, then select Connect > Trim Elements to Roof / Shell. In the Trim Elements dialog, click on the Use Roofs / Shells from current selection, then click Trim. You’ll see the model change. The selected curtain wall may show the scheme grid sticking up above the roof, but as soon as you deselect it, you’ll see it in the final form.
You may also use SEO by setting the roof(s) as the Operator, the curtain wall as the Target, with the operation being Subtraction with Upwards Extrusion.
In both of these cases, the roof cannot be deleted, because the Connection or SEO is connected to that element. If you don’t want to see the roof (for example, you just want to cut off the top of the curtain wall or other walls) then you may simply put this roof on a layer that you hide.
It is still possible to do a command that is like what you are used to. It no longer is called Trim to Roof, now it is called Crop to Single-plane Roof. You must either draw your roof with the single-plane option, or select a multi-plane roof (the new option introduced into ArchiCAD 15 for creating complex roof systems) and right-click and choose Split into Single-plane Roofs.
Then you can select the roof(s) and curtain wall(s) (as well as other elements) and right-click, then select Crop to Single-plane Roof. A dialog box will come up similar to previous versions of ArchiCAD, allowing you to Crop Element Top (or Base). This cropping will be semi-permanent – you can delete the roof and the crop will remain, just like the old Trim command.
For curtain walls, if you want to cut off the top and NOT have a roof above, it actually may be easier to simply edit the Scheme. Select the curtain wall and click the Edit link nearby, then click the eyeball in the curtain wall editing palette to make the Scheme visible. You may edit the heavy polygon line that shows the boundary, just like any standard polygon, making it have a slanted, curved or segmented top or edges. The scheme boundary determines the edge frame, so you can very easily create it to the shape you need without introducing a roof into the model. (In that sense, it works much more flexibly than the wall tool.)
Integrating Google Earth Locations into ArchiCAD 17 and Creating real Contour Lines
in this tutorial I will show how we can import specific location from Google Earth and then integrate it into ArchiCAD so we end up with real contour lines f…